
How To Create Repeat Patterns in Illustrator With Fabric Swatches
 Charlie Bradley Ross
Tuesday, 29 September 2015
Charlie Bradley Ross
Tuesday, 29 September 2015
The multi-talented Sew Heidi is back with a new illustrator tutorial just for you. Find out how to create repeat patterns in illustrator using existing fabric swatches. You can mock up your garments before you buy the fabrics! Without further ado, here she is:
In a previous article, I shared an overview of Illustrator and how it will change your design world. One of the features I mentioned was the ability to mock up repeating patterns from a fabric swatch found online, and in this tutorial I'm going to show you just how to do that with your favourite fabrics found at Offset Warehouse. This is a great process to go through before you buy your fabric, so you can make sure you like how it looks in a finished garment.
What You'll Need:
Adobe Illustrator (any version, you can grab a free trial here)
Skill Level:
Beginner / Intermediate (basic AI skills required)
Let's Get Started!
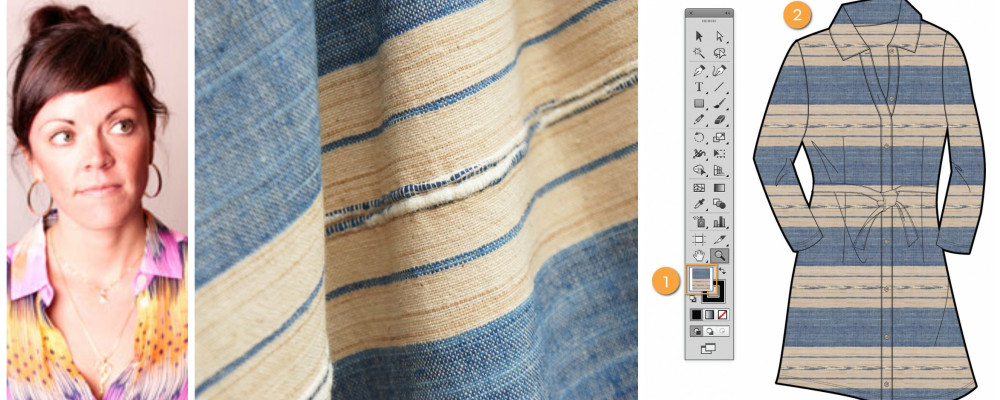
In this example, I've chosen to use the Blue & Harvest Gold Slub Stripe fabric. You can choose whatever fabric you like, but make sure you have an image that includes one full repeat of the pattern if you want to create a nice seamless repeat.
Step 1: Crop A Screenshot
I prefer to grab my images with a cropped screenshot, and you can easily do this too.
On a Mac: hold cmd+shift+3 and drag around the image you would like to capture
On a PC: use the Snipping Tool instructions found here.
If the image/site allows, you can also right click on it and choose Save Image As.

Step 2: Place the Image in Illustrator
With a new document ready to go in Illustrator, choose File > Place (1). Once the dialog box opens, find the screenshot or saved image on your computer, make sure the box for Link is unchecked (2) and choose Place (3). Note: this will not work unless the checkbox for Link is unchecked, so make sure!

Step 3: Identify One Repeat
With the image placed in your Illustrator document, we'll next identify one repeat which we'll use to create our seamless repeating pattern. Grab the Rectangle Tool and draw a rectangle around the edges of where you see one repeat tile (1). If you don't draw the rectangle perfectly the first time, you can always adjust it with the Selection Tool after. I prefer to use a bright color that contrasts my fabric to draw my rectangle so that I can clearly see that the edges of it outline one exact repeat.

Step 4: Define the Rectangle as the Repeat Edge
This next process includes 2 crucial steps, and if not done correctly, the pattern will not appear as a seamless repeat, so make sure to follow closely and double check. Make sure your rectangle is selected (just the rectangle and not the screenshot / image of your fabric) and complete the 2 following steps:
This next process includes 2 crucial steps, and if not done correctly, the pattern will not appear as a seamless repeat, so make sure to follow closely and double check. Make sure your rectangle is selected (just the rectangle and not the screenshot / image of your fabric) and complete the 2 following steps:
- Assign no stroke & no fill to your rectangle (yes, we drew it in a bright color to start, but that was just so we could clearly see it on the fabric). You want this to be an "invisible" rectangle that has no stroke and no fill.
- Send your rectangle to the back (Object > Arrange > Send to Back) so that it's behind the image of the fabric.

Once you have an "invisible" rectangle that is in the very back of the artwork, Illustrator know to use this rectangle as the edges of the pattern tile (as opposed to the edges of the actual screenshot / image, which is what the edges of the tile would naturally be defined as).
Step 5: Create the Repeating Pattern
Select both the image of the fabric AND the "invisible" rectangle (1) with the Selection Tool, and drag and drop them into the Swatches Panel (2) (Window > Swatches).

Once in the artwork has been dragged into the Swatches Panel, you should see a small thumbnail that looks like one repeat of the pattern (by default named New Pattern Swatch) (3). Now that you've made the pattern swatch, it's ready to use!

Step 6: Use the Pattern Swatch
Create any shape, illustration or drawing that you want to fill with your pattern, and apply the pattern to the fill position (1). I'm using a dress illustration I already had previously done and have applied the pattern fill to the body of the dress to quickly mock up how the fabric may look in real life (2).

Step 7: Adjust the Pattern Size
Chances are, the pattern hasn't automatically filled your garment in the correct scale. If this is the case, it's quite easy to adjust! With the garment selected, choose Object > Transform > Scale (1). Once the dialog box opens, pay close attention to the options. You'll want to uncheck Scale Strokes & Effects and Transform Objects, and make sure Transform Patterns is checked (I also like to make sure Preview is checked so I can see the results live) (2). These settings allow you to control the pattern independent from the actual object it fills (in this example the dress). Once these settings are correct, input the value you want to scale to (3). In this example, 50% gives a fairly accurate representation of what the fabric scale may look like in real life. Note that this value will vary depending on how large your pattern swatch image was and how large your sketch is. Once you're satisfied with the results, click OK (4).

Step 8: Adjust the Pattern Direction
You can just as easily adjust the direction of the pattern as well, in case you want to sew on the bias or vertical. The process is the same as above where we adjusted the size, but we'll choose Object > Transform > Rotate (1). Next, make sure the Options are set correct with Transform Objects unchecked and Transform Patterns checked (2) and choose the amount of rotation you want (in this example I chose 45 degrees (3) to emulate the fabric on the bias). Once you're happy with the result, click OK (4).

Troubleshooting
If you dragged the artwork into the Swatches Panel but no swatch was created, chances are your image is linked (as opposed to embedded). See Step 2 and try again!
If your pattern did not come out correctly, chances are you did not complete Step 4 correctly. After many years of teaching Illustrator, this is the most common place I see designers stumble. I suggest starting over with just the fabric swatch and drawing your rectangle again from scratch, completing Steps 3-8 over again.
If you like these articles, then why not sign up for our monthly article roundups? Use the twitter buttons throughout the article and below to share.
Learning how to create #repeat #patterns on @Illustrator from @sewheidi & @OffsetWarehouse

Thanks for the #tutorial @sewheidi mocking up #repeating #patterns from a #fabric swatch